

Sync data from Postgres
Sync updates to your primary Postgres database with Tiger Cloud in real time
You use the source PostgreSQL connector in Tiger Cloud to synchronize all data or specific tables from a PostgreSQL database instance to your service, in real time. You run the connector continuously, turning PostgreSQL into a primary database with your service as a logical replica. This enables you to leverage Tiger Cloud‘s real-time analytics capabilities on your replica data.
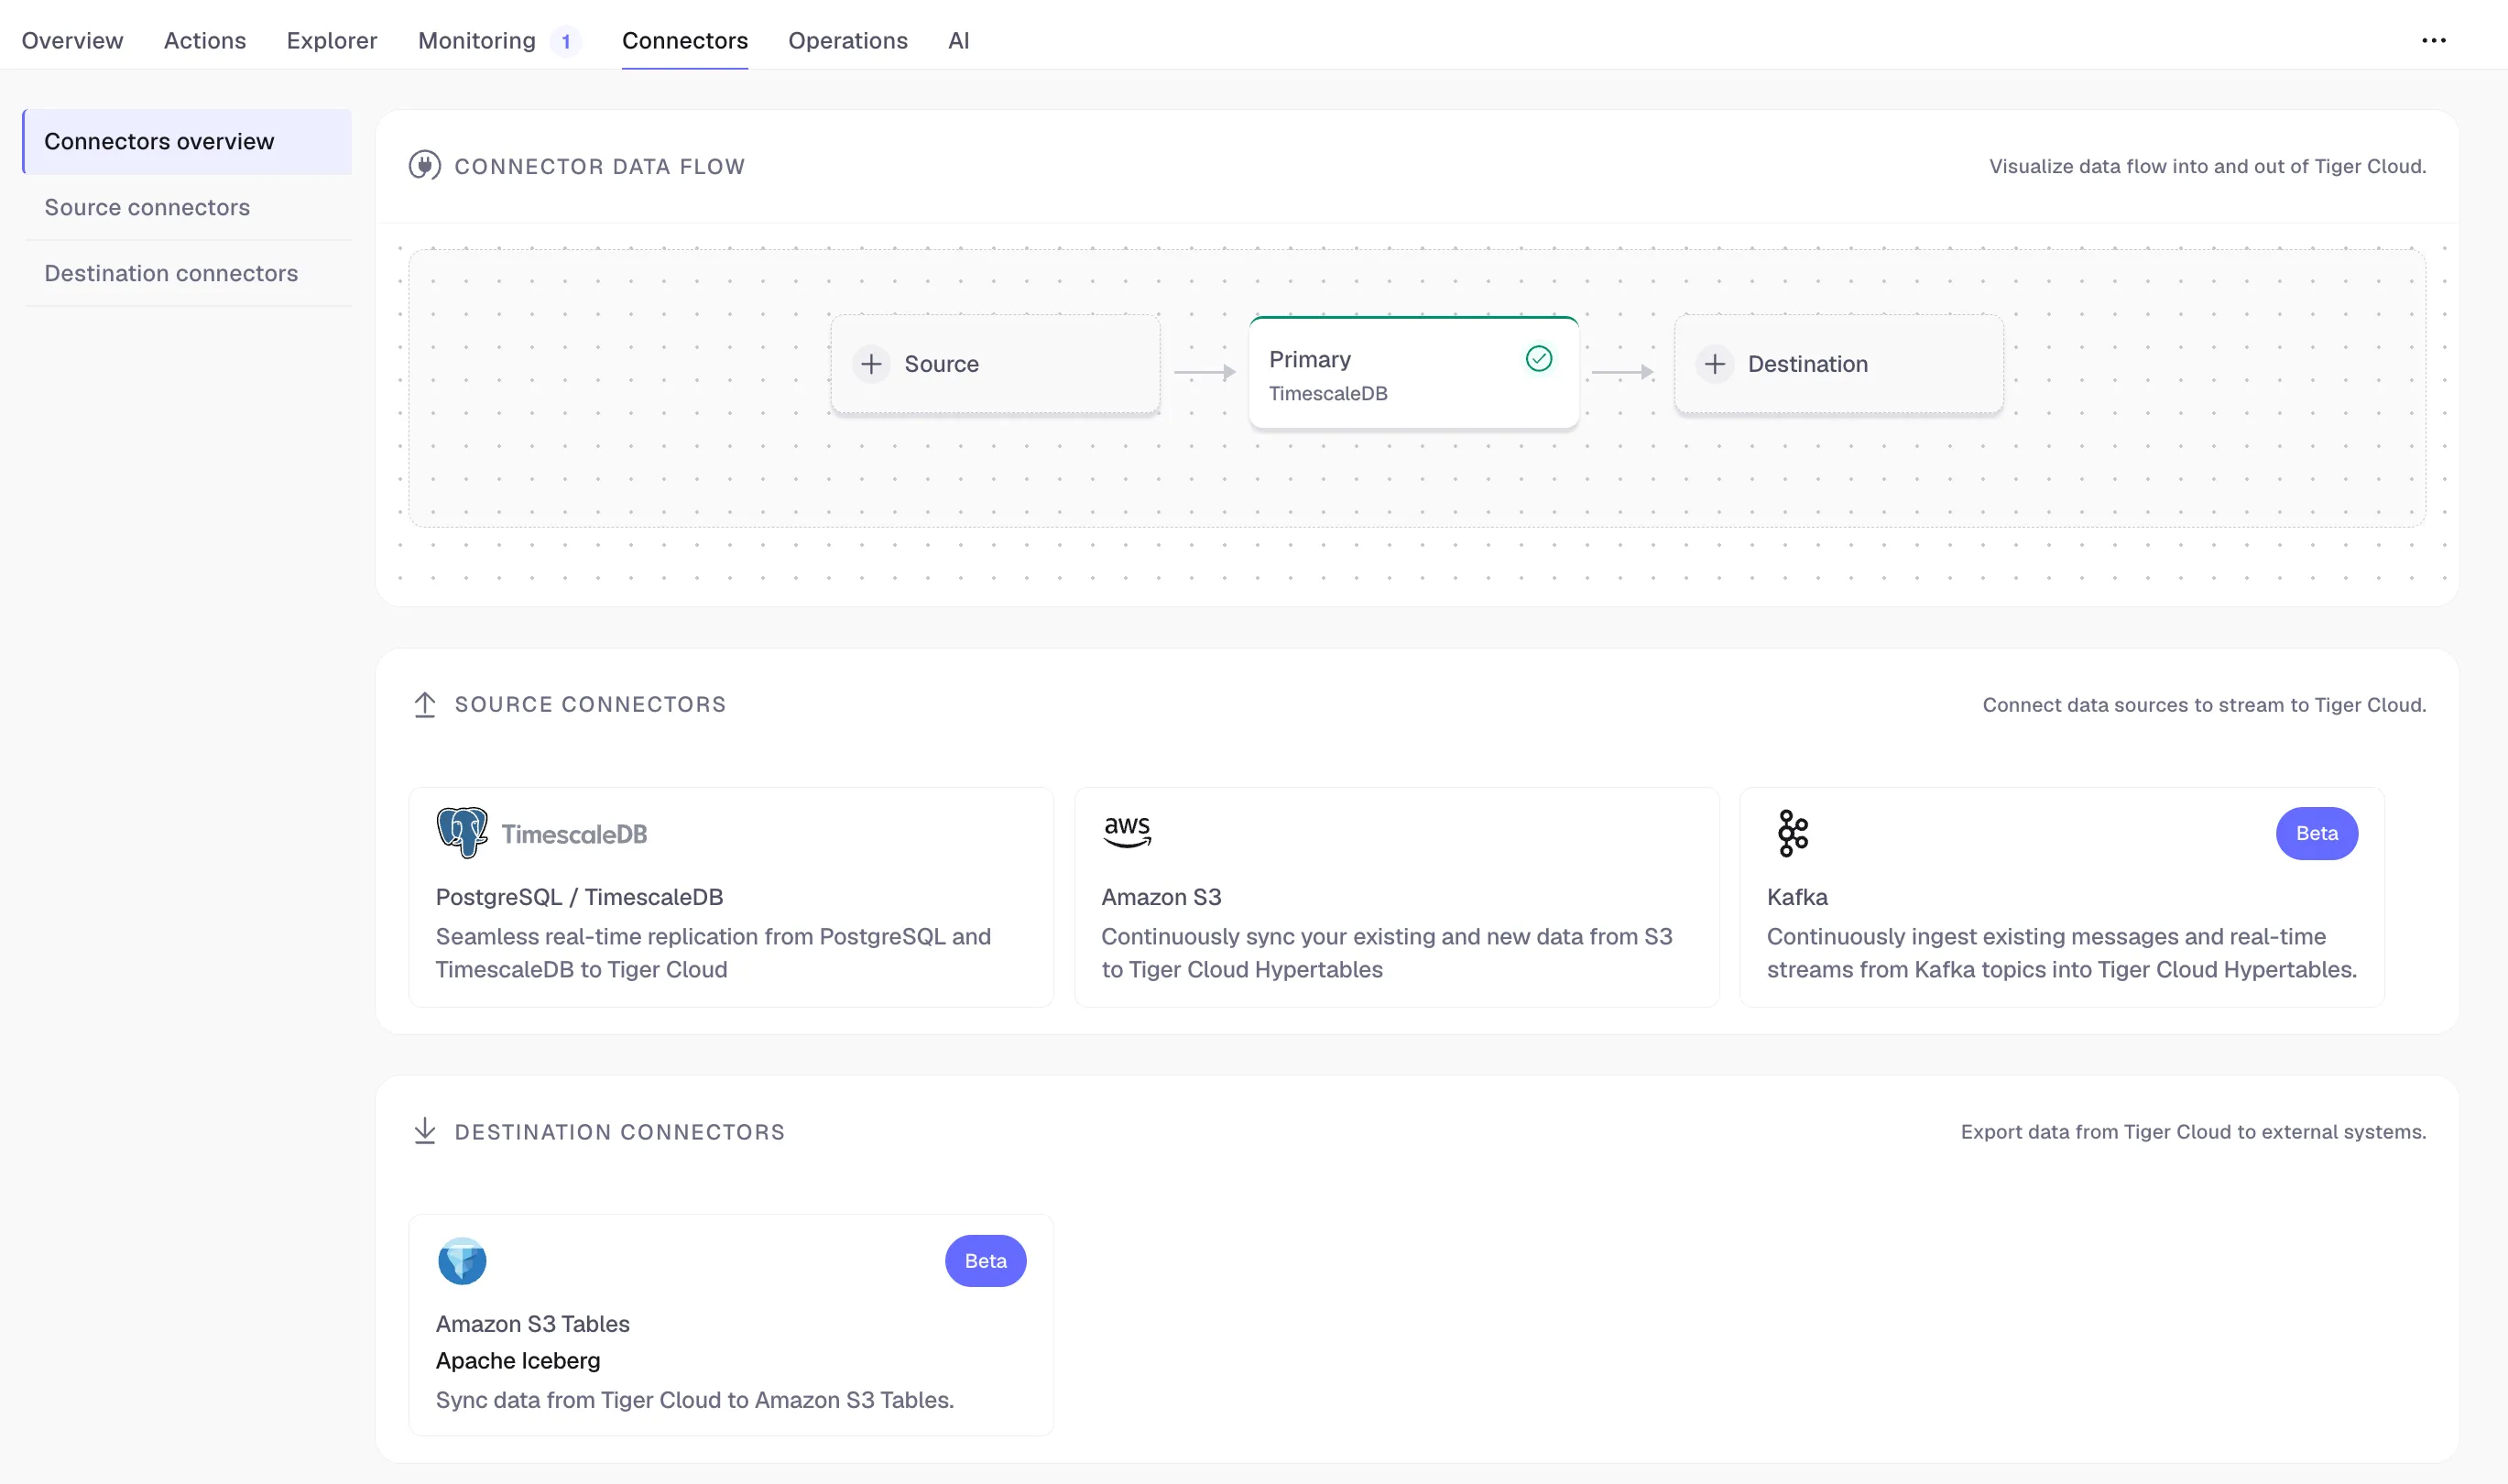
The source PostgreSQL connector in Tiger Cloud leverages the well-established PostgreSQL logical replication protocol. By relying on this protocol, Tiger Cloud ensures compatibility, familiarity, and a broader knowledge base, making it easier for you to adopt the connector and integrate your data.
You use the source PostgreSQL connector for data synchronization, rather than migration. This includes:
-
Copy existing data from a PostgreSQL instance to a Tiger Cloud service:
-
Copy data at up to 150 GB/hr.
You need at least a 4 CPU/16 GB source database, and a 4 CPU/16 GB target service.
-
Copy the publication tables in parallel.
Large tables are still copied using a single connection. Parallel copying is in the backlog.
-
Forget foreign key relationships.
The connector disables foreign key validation during the sync. For example, if a
metricstable refers to theidcolumn on thetagstable, you can still sync only themetricstable without worrying about their foreign key relationships. -
Track progress.
PostgreSQL exposes
COPYprogress underpg_stat_progress_copy.
-
-
Synchronize real-time changes from a PostgreSQL instance to a Tiger Cloud service.
-
Add and remove tables on demand using the PostgreSQL PUBLICATION interface.
-
Enable features such as hypertables, columnstore, and continuous aggregates on your logical replica.
-
Indexes, primary key, unique constraints, and sequences are not migrated. Create needed indexes on the target for your queries.
-
TimescaleDB as source has limited support (e.g. no continuous aggregates).
-
Schema changes must be coordinated: apply compatible changes on the target first, then on the source.
-
WAL volume on the source increases during large table copy.
-
Continuous aggregates: The connector uses
session_replication_role=replicaduring copy, so triggers (including continuous aggregate invalidation) do not run. Data synced during initial load below a continuous aggregate’s materialization watermark may not appear in the aggregate until you manually refresh. If the aggregate exists on the source, include it in the connector’s publication; if only on the target, use theforceoption of refresh_continuous_aggregate to refresh affected ranges.
Prerequisites for this integration guide
To follow these steps, you'll need:
- Your connection details.
-
The PostgreSQL client tools installed on your sync machine.
-
The source PostgreSQL instance and the target Tiger Cloud service must have the same extensions installed.
The source PostgreSQL connector does not create extensions on the target. If the table uses column types from an extension, first create the extension on the target Tiger Cloud service before syncing the table.
Limitations
-
Indexes, including the primary key, unique constraints, and sequences are not migrated to the target Tiger Cloud service.
We recommend that, depending on your query patterns, you create only the necessary indexes on the target Tiger Cloud service.
-
Using TimescaleDB as the source has limited support (no CAGGs).
-
The source must be running PostgreSQL 13 or later.
-
Schema changes must be co-ordinated.
Make compatible changes to the schema in your Tiger Cloud service first, then make the same changes to the source PostgreSQL instance.
-
Ensure that the source PostgreSQL instance and the target Tiger Cloud service have the same extensions installed.
The source PostgreSQL connector does not create extensions on the target. If the table uses column types from an extension, first create the extension on the target Tiger Cloud service before syncing the table.
-
There is WAL volume growth on the source PostgreSQL instance during large table copy.
-
Continuous aggregate invalidation
The connector uses
session_replication_role=replicaduring data replication, which prevents table triggers from firing. This includes the internal triggers that mark continuous aggregates as invalid when underlying data changes.If you have continuous aggregates on your target database, they do not automatically refresh for data inserted during the migration. This limitation only applies to data below the continuous aggregate’s materialization watermark. For example, backfilled data. New rows synced above the continuous aggregate watermark are used correctly when refreshing.
This can lead to:
- Missing data in continuous aggregates for the migration period.
- Stale aggregate data.
- Queries returning incomplete results.
If the continuous aggregate exists in the source database, best practice is to add it to the PostgreSQL connector publication. If it only exists on the target database, manually refresh the continuous aggregate using the
forceoption of refresh_continuous_aggregate.
Set your connection string
This variable holds the connection information for the source database. In the terminal on your migration machine, set the following:
export SOURCE="postgres://<user>:<password>@<source host>:<source port>/<db_name>"Avoid using connection strings that route through connection poolers like PgBouncer or similar tools. This tool requires a direct connection to the database to function properly.
Tune your source database
Updating parameters on a PostgreSQL instance will cause an outage. Choose a time that will cause the least issues to tune this database.
- Tune the Write Ahead Log (WAL) on the RDS/Aurora PostgreSQL source database
-
In RDS console, select the RDS instance to migrate.
-
Click
Configuration, scroll down and note theDB instance parameter group, then clickParameter Groups.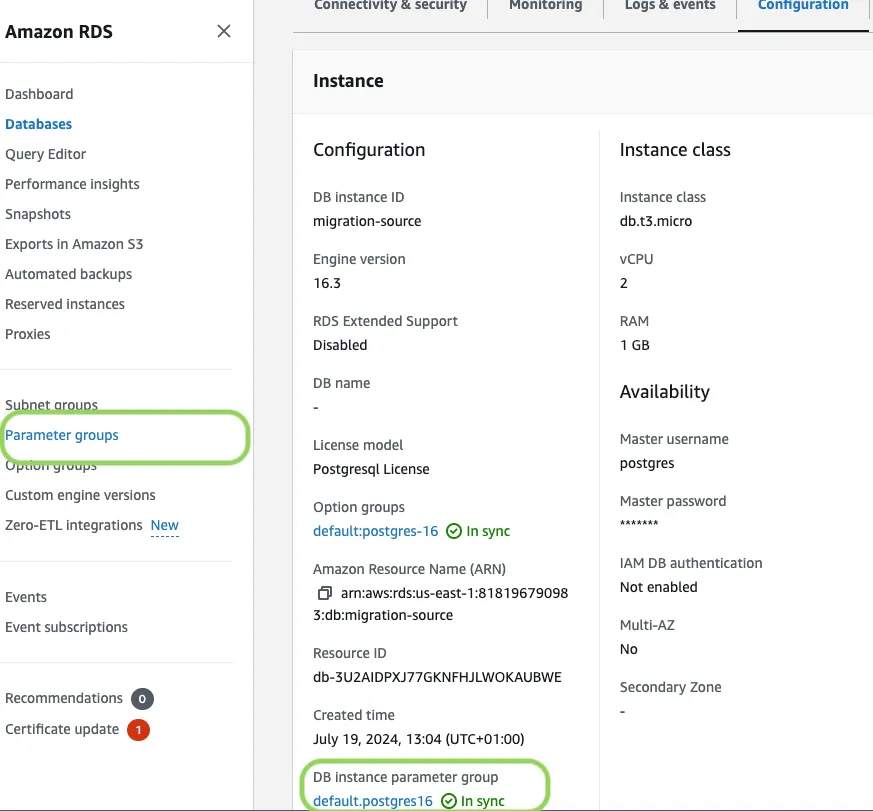
-
Click
Create parameter group, fill in the form with the following values, then clickCreate:Parameter group name, whatever suits your fancy.Description, knock yourself out with this one.Engine type,{C.PG}Parameter group family, the same asDB instance parameter groupin yourConfiguration.
-
In
Parameter groups, select the parameter group you created, then clickEdit. -
Update the following parameters, then click
Save changes:rds.logical_replicationset to1: record the information needed for logical decoding.wal_sender_timeoutset to0: disable the timeout for the sender process.
-
In RDS, navigate back to your databases, select the RDS instance to migrate, and click
Modify. -
Scroll down to
Database options, select your new parameter group, and clickContinue. -
Click
Apply immediatelyor choose a maintenance window, then clickModify DB instance.
Changing parameters will cause an outage. Wait for the database instance to reboot before continuing. After it comes back up, verify that the new settings are in effect on your database.
-
- Create a user for the source PostgreSQL connector and assign permissions
-
Create
<pg connector username>:Terminal window psql $SOURCE -c "CREATE USER <pg connector username> PASSWORD '<password>'"You can use an existing user. However, you must ensure that the user has the following permissions.
-
Grant permissions to create a replication slot:
Terminal window psql $SOURCE -c "GRANT rds_replication TO <pg connector username>" -
Grant permissions to create a publication:
Terminal window psql $SOURCE -c "GRANT CREATE ON DATABASE <database name> TO <pg connector username>" -
Assign the user permissions on the source database:
Terminal window psql $SOURCE <<EOFGRANT USAGE ON SCHEMA "public" TO <pg connector username>;GRANT SELECT ON ALL TABLES IN SCHEMA "public" TO <pg connector username>;ALTER DEFAULT PRIVILEGES IN SCHEMA "public" GRANT SELECT ON TABLES TO <pg connector username>;EOFIf the tables you are syncing are not in the
publicschema, grant the user permissions for each schema you are syncing:Terminal window psql $SOURCE <<EOFGRANT USAGE ON SCHEMA <schema> TO <pg connector username>;GRANT SELECT ON ALL TABLES IN SCHEMA <schema> TO <pg connector username>;ALTER DEFAULT PRIVILEGES IN SCHEMA <schema> GRANT SELECT ON TABLES TO <pg connector username>;EOF -
On each table you want to sync, make
<pg connector username>the owner:Terminal window psql $SOURCE -c 'ALTER TABLE <table name> OWNER TO <pg connector username>;'You can skip this step if the replicating user is already the owner of the tables.
-
- Enable replication DELETE and UPDATE operations
Replica identity assists data replication by identifying the rows being modified. Your options are that each table and hypertable in the source database should either have:
- A primary key: data replication defaults to the primary key of the table being replicated. Nothing to do.
- A viable unique index: each table has a unique, non-partial, non-deferrable index that includes only columns marked as
NOT NULL. If a UNIQUE index does not exist, create one to assist the migration. You can delete it after migration. For each table, setREPLICA IDENTITYto the viable unique index:psql -X -d $SOURCE -c ‘ALTER TABLE <table name> REPLICA IDENTITY USING INDEX <_index_name>‘ - No primary key or viable unique index: use brute force. For each table, set
REPLICA IDENTITYtoFULL:
For eachpsql -X -d $SOURCE -c ‘ALTER TABLE <table_name> REPLICA IDENTITY FULL’UPDATEorDELETEstatement, PostgreSQL reads the whole table to find all matching rows. This results in significantly slower replication. If you are expecting a large number ofUPDATEorDELETEoperations on the table, best practice is to not useFULL.
- Tune the Write Ahead Log (WAL) on the PostgreSQL source databasepsql $SOURCE <<EOFALTER SYSTEM SET wal_level='logical';ALTER SYSTEM SET max_wal_senders=10;ALTER SYSTEM SET wal_sender_timeout=0;EOF
This will require a restart of the PostgreSQL source database.
- Create a user for the connector and assign permissions
-
Create
<pg connector username>:psql $SOURCE -c "CREATE USER <pg connector username> PASSWORD '<password>'"You can use an existing user. However, you must ensure that the user has the following permissions.
-
Grant permissions to create a replication slot:
psql $SOURCE -c "ALTER ROLE <pg connector username> REPLICATION" -
Grant permissions to create a publication:
psql $SOURCE -c "GRANT CREATE ON DATABASE <database name> TO <pg connector username>" -
Assign the user permissions on the source database:
psql $SOURCE <<EOFGRANT USAGE ON SCHEMA "public" TO <pg connector username>;GRANT SELECT ON ALL TABLES IN SCHEMA "public" TO <pg connector username>;ALTER DEFAULT PRIVILEGES IN SCHEMA "public" GRANT SELECT ON TABLES TO <pg connector username>;EOFIf the tables you are syncing are not in the
publicschema, grant the user permissions for each schema you are syncing:psql $SOURCE <<EOFGRANT USAGE ON SCHEMA <schema> TO <pg connector username>;GRANT SELECT ON ALL TABLES IN SCHEMA <schema> TO <pg connector username>;ALTER DEFAULT PRIVILEGES IN SCHEMA <schema> GRANT SELECT ON TABLES TO <pg connector username>;EOF -
On each table you want to sync, make
<pg connector username>the owner:psql $SOURCE -c 'ALTER TABLE <table name> OWNER TO <pg connector username>;'You can skip this step if the replicating user is already the owner of the tables.
-
- Enable replication DELETE and UPDATE operations
Replica identity assists data replication by identifying the rows being modified. Your options are that each table and hypertable in the source database should either have:
- A primary key: data replication defaults to the primary key of the table being replicated. Nothing to do.
- A viable unique index: each table has a unique, non-partial, non-deferrable index that includes only columns marked as
NOT NULL. If a UNIQUE index does not exist, create one to assist the migration. You can delete it after migration. For each table, setREPLICA IDENTITYto the viable unique index:psql -X -d $SOURCE -c ‘ALTER TABLE <table name> REPLICA IDENTITY USING INDEX <_index_name>‘ - No primary key or viable unique index: use brute force. For each table, set
REPLICA IDENTITYtoFULL:
For eachpsql -X -d $SOURCE -c ‘ALTER TABLE <table_name> REPLICA IDENTITY FULL’UPDATEorDELETEstatement, PostgreSQL reads the whole table to find all matching rows. This results in significantly slower replication. If you are expecting a large number ofUPDATEorDELETEoperations on the table, best practice is to not useFULL.
Synchronize data to your Tiger Cloud service
To sync data from your PostgreSQL database to your Tiger Cloud service using Tiger Console:
- Connect to your Tiger Cloud service
In Tiger Console, select the service to sync live data to.
- Prepare the source database
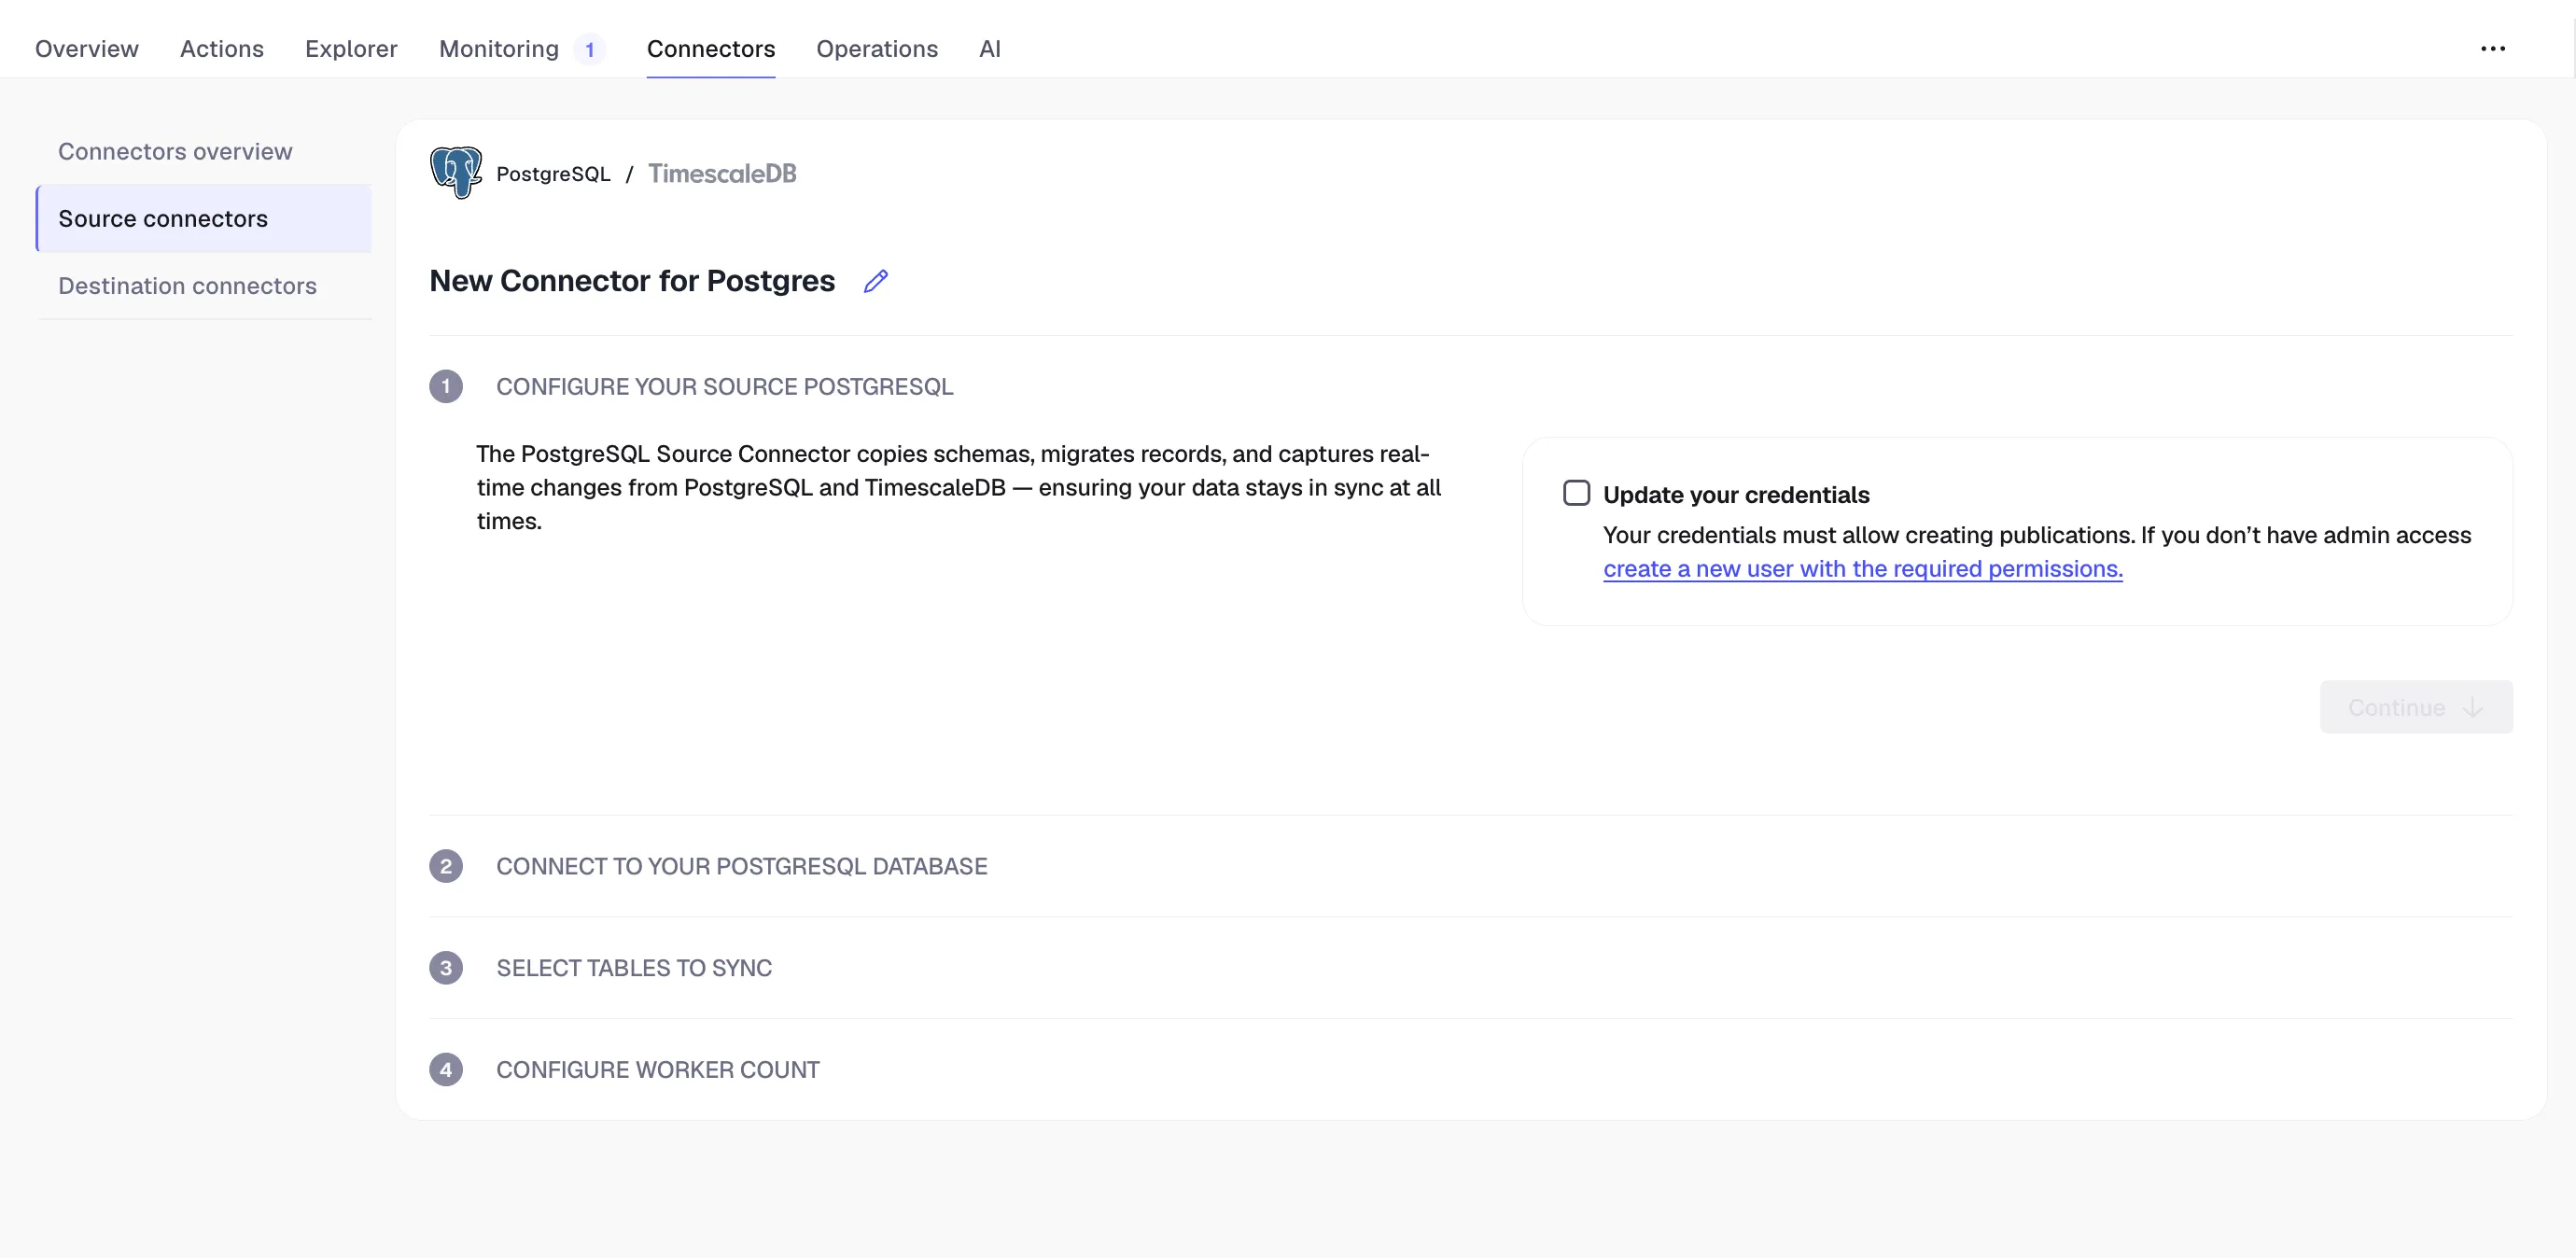
a. Click
Connectors>{C.PG}. b. Set the name for the new connector by clicking the pencil icon. c. Check the boxes forSet wal_level to logicalandUpdate your credentials, then clickContinue. - Connect the source database and the target service
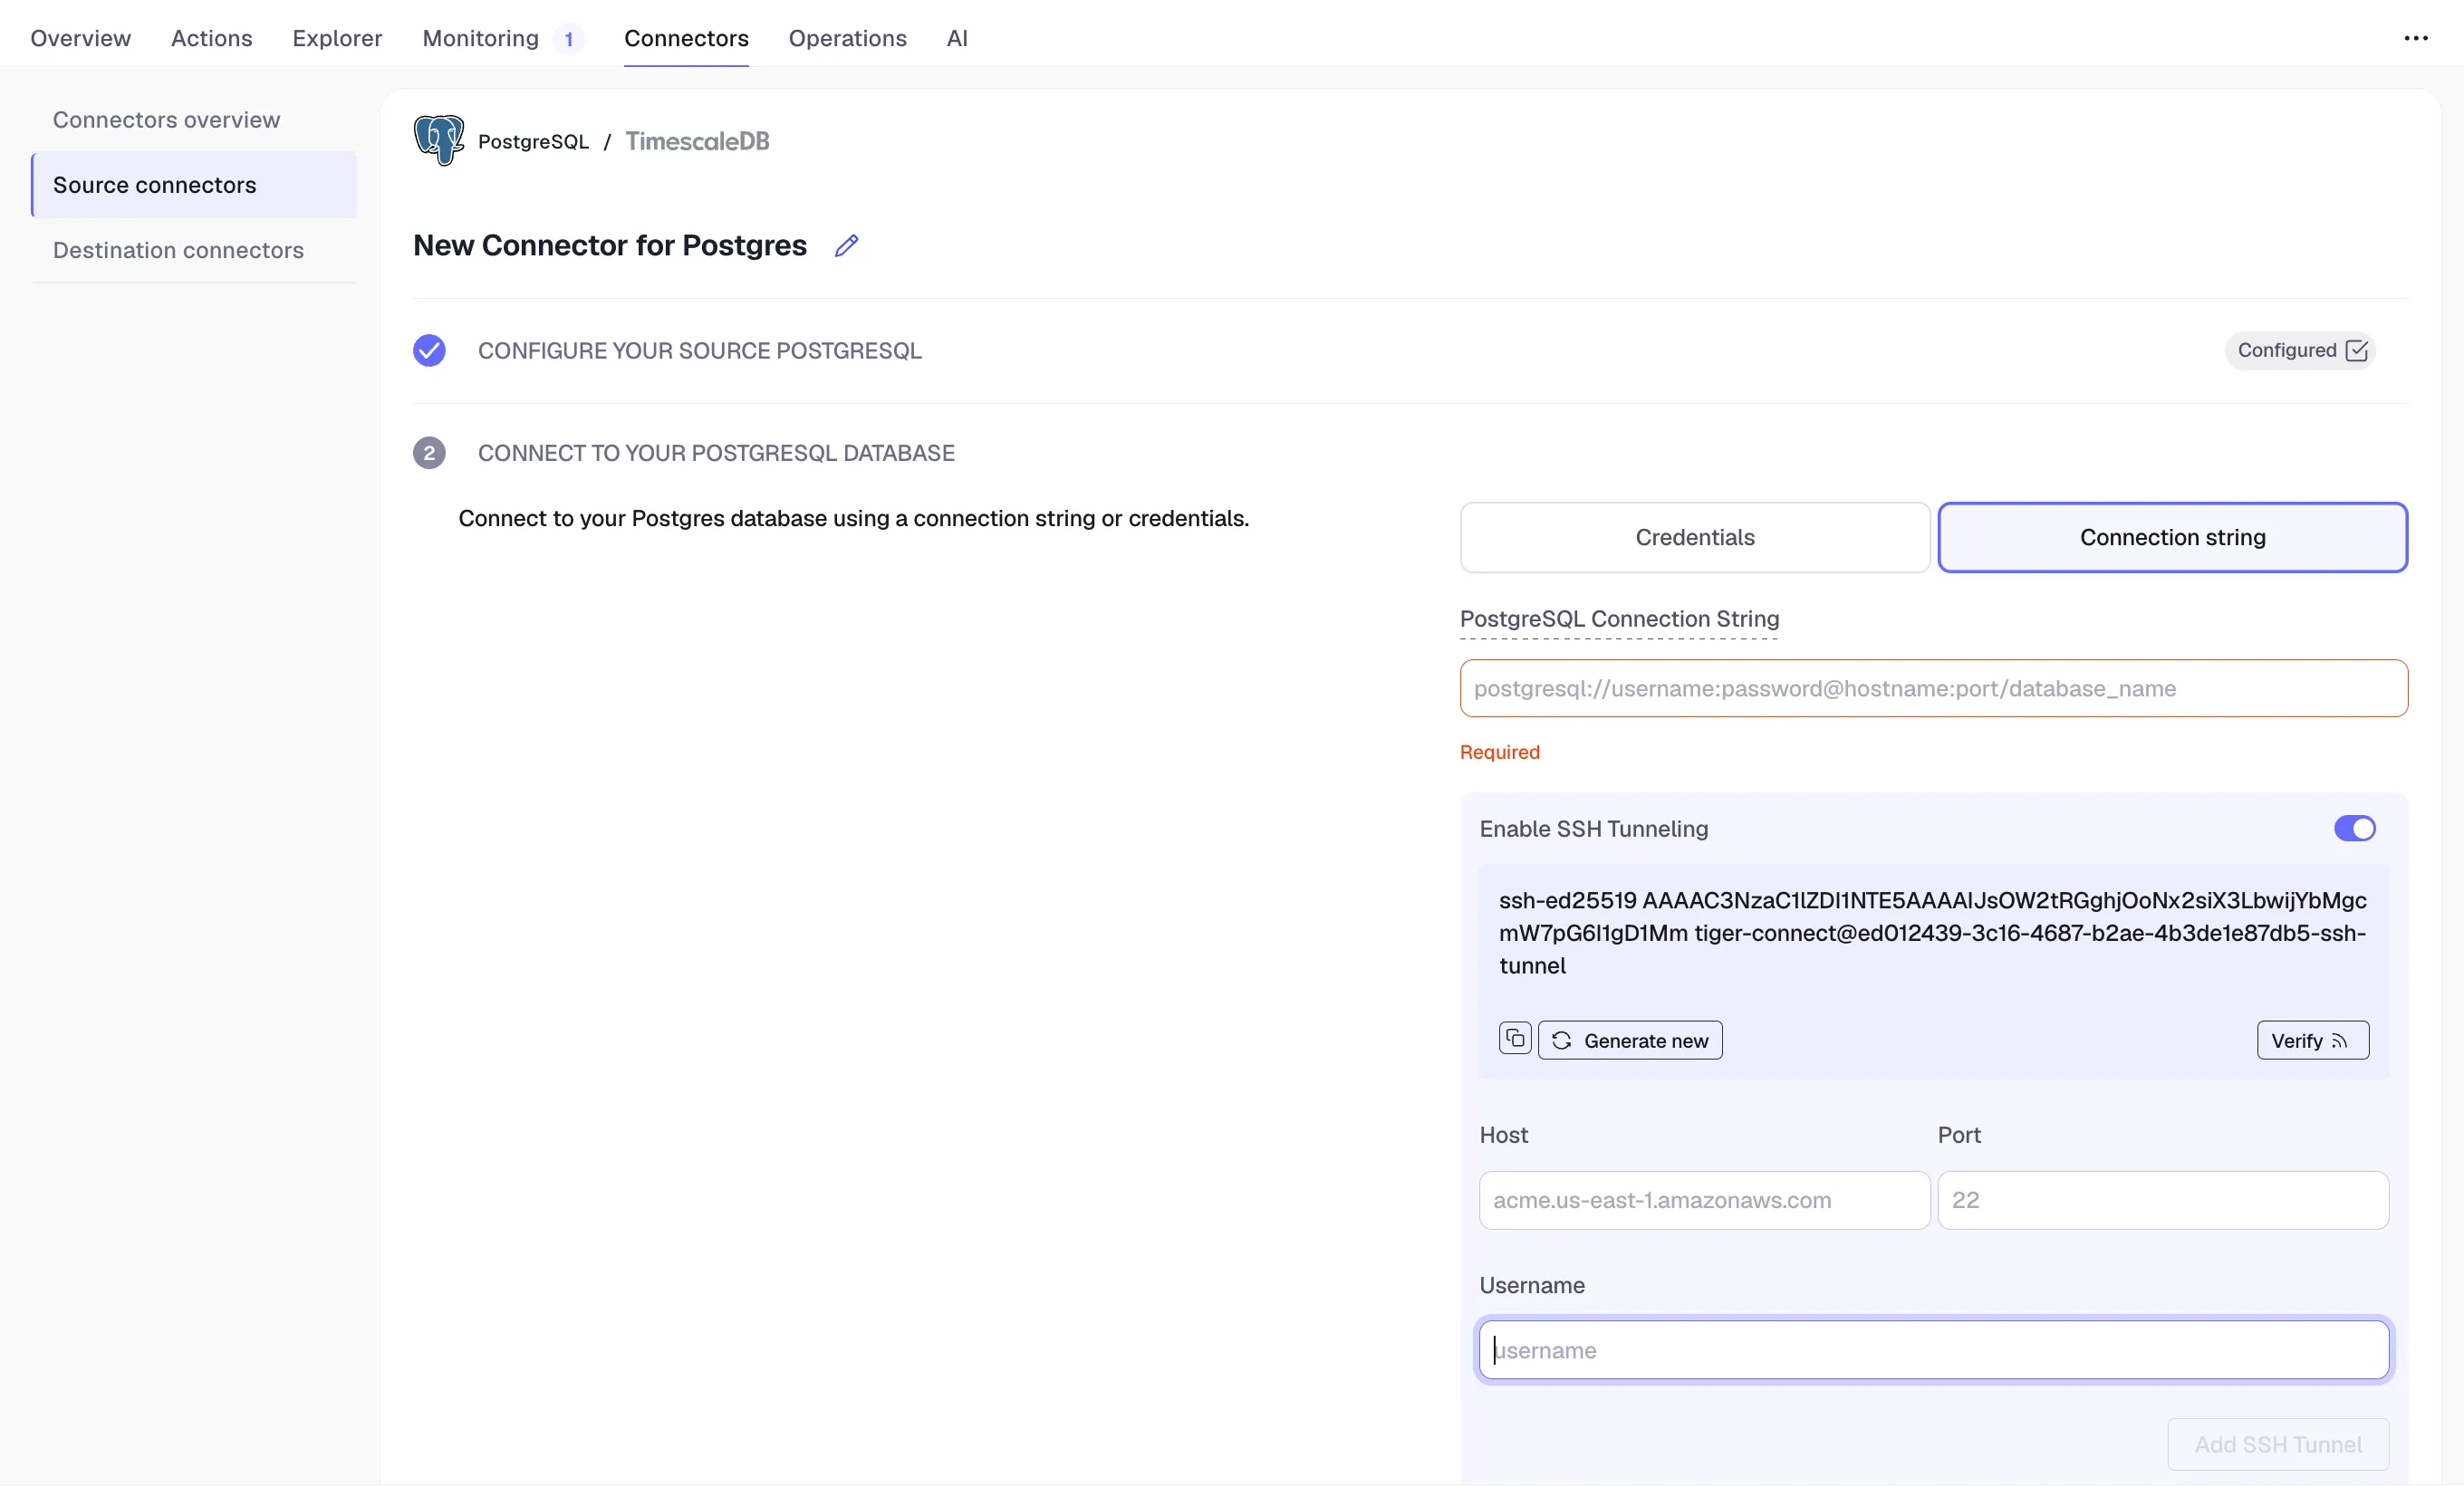
a. Enter your database credentials or a PostgreSQL connection string. This is the connection string for
<pg connector username>.b. Recommended for private databases. If the source database is not reachable from the public Internet, toggle
Enable SSH tunnelingand route the connector through a bastion host:-
Copy the public key shown in the wizard and append it to the
authorized_keysfile of the user the connector will log in as on the bastion host:Terminal window echo "<public key from the connector wizard>" >> ~/.ssh/authorized_keys# Verifycat ~/.ssh/authorized_keys -
Enter the bastion
Hostname,User, andPortin the wizard.
c. Click
Connect to database. Tiger Console connects to the source database and retrieves the schema information. -
- Select the data to synchronize
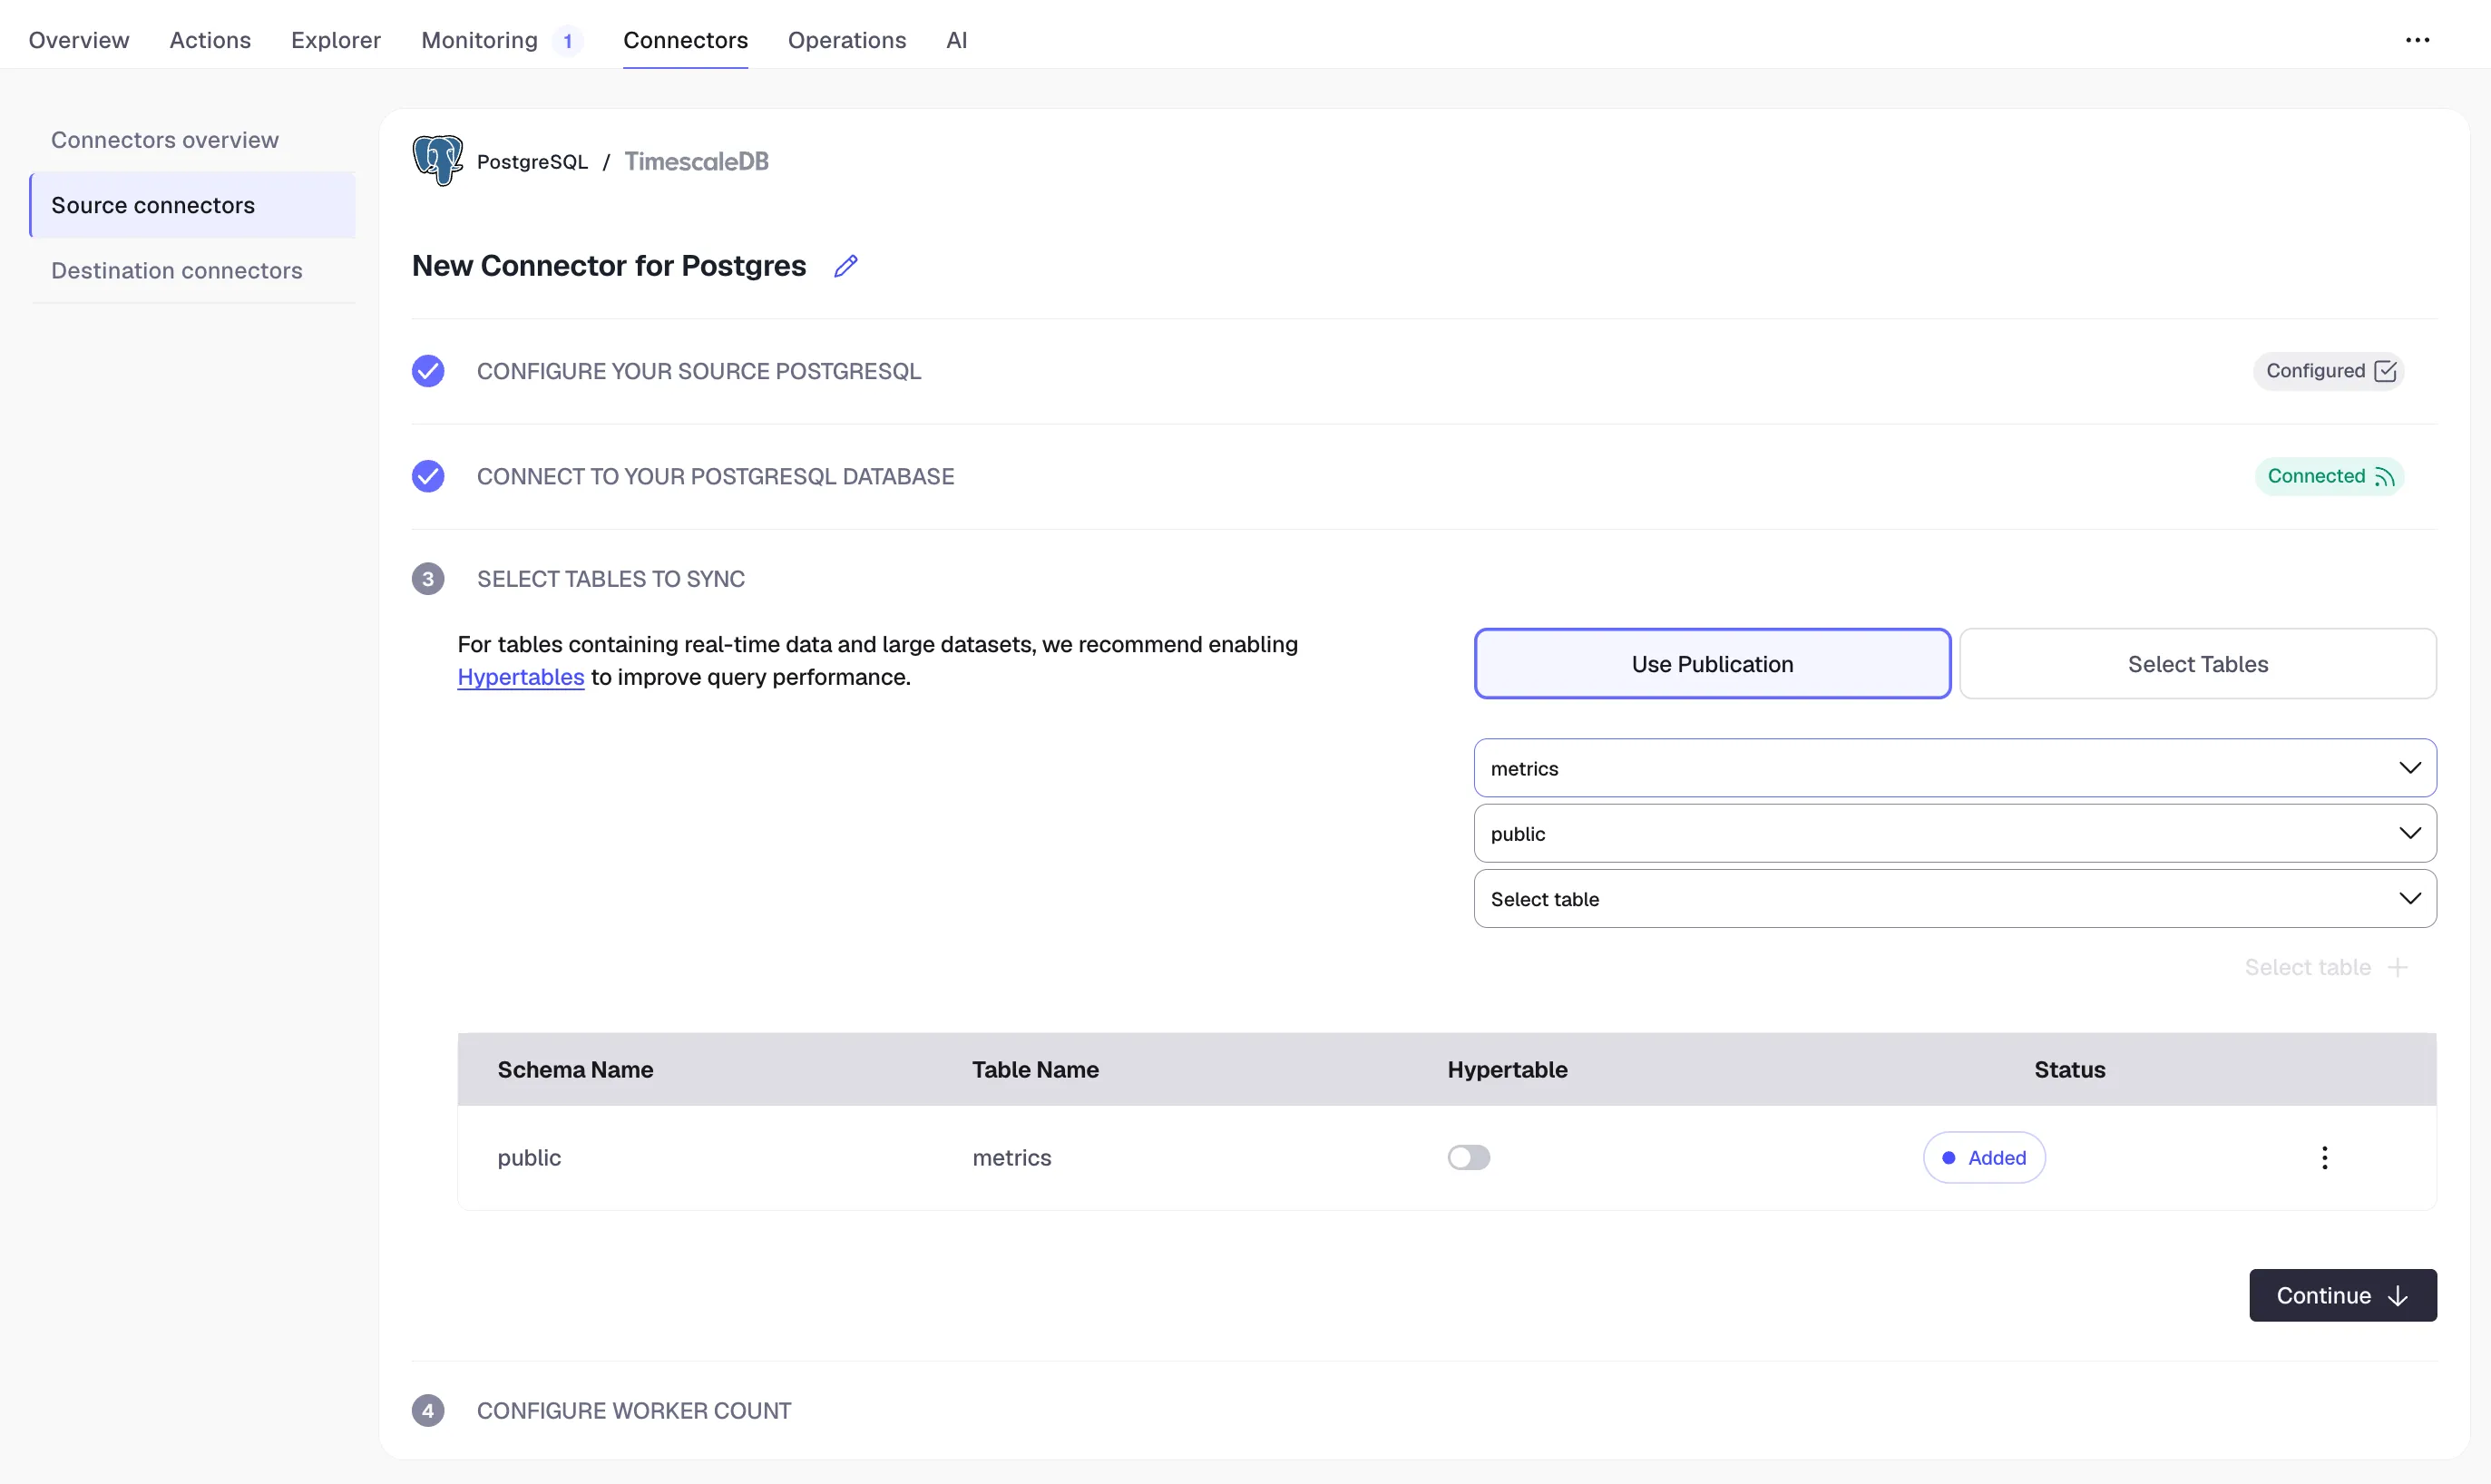
Choose where the connector picks tables from:
- From an existing publication: select a PostgreSQL
PUBLICATIONname, then pick schemas and tables from those it includes. Use this when you cannot grant the connector userCREATEprivilege on the source — your DBA can pre-create the publication — or when you want to apply row or column filters on published tables. - Directly from the source: select schemas, then pick the tables to sync from them. Tiger Console creates the publication for you.
Click
Select tables +. For each selected table, Tiger Console checks the schema and, if possible, suggests the column to use as the time dimension in a hypertable. - From an existing publication: select a PostgreSQL
- Configure Initial Data Copy workers
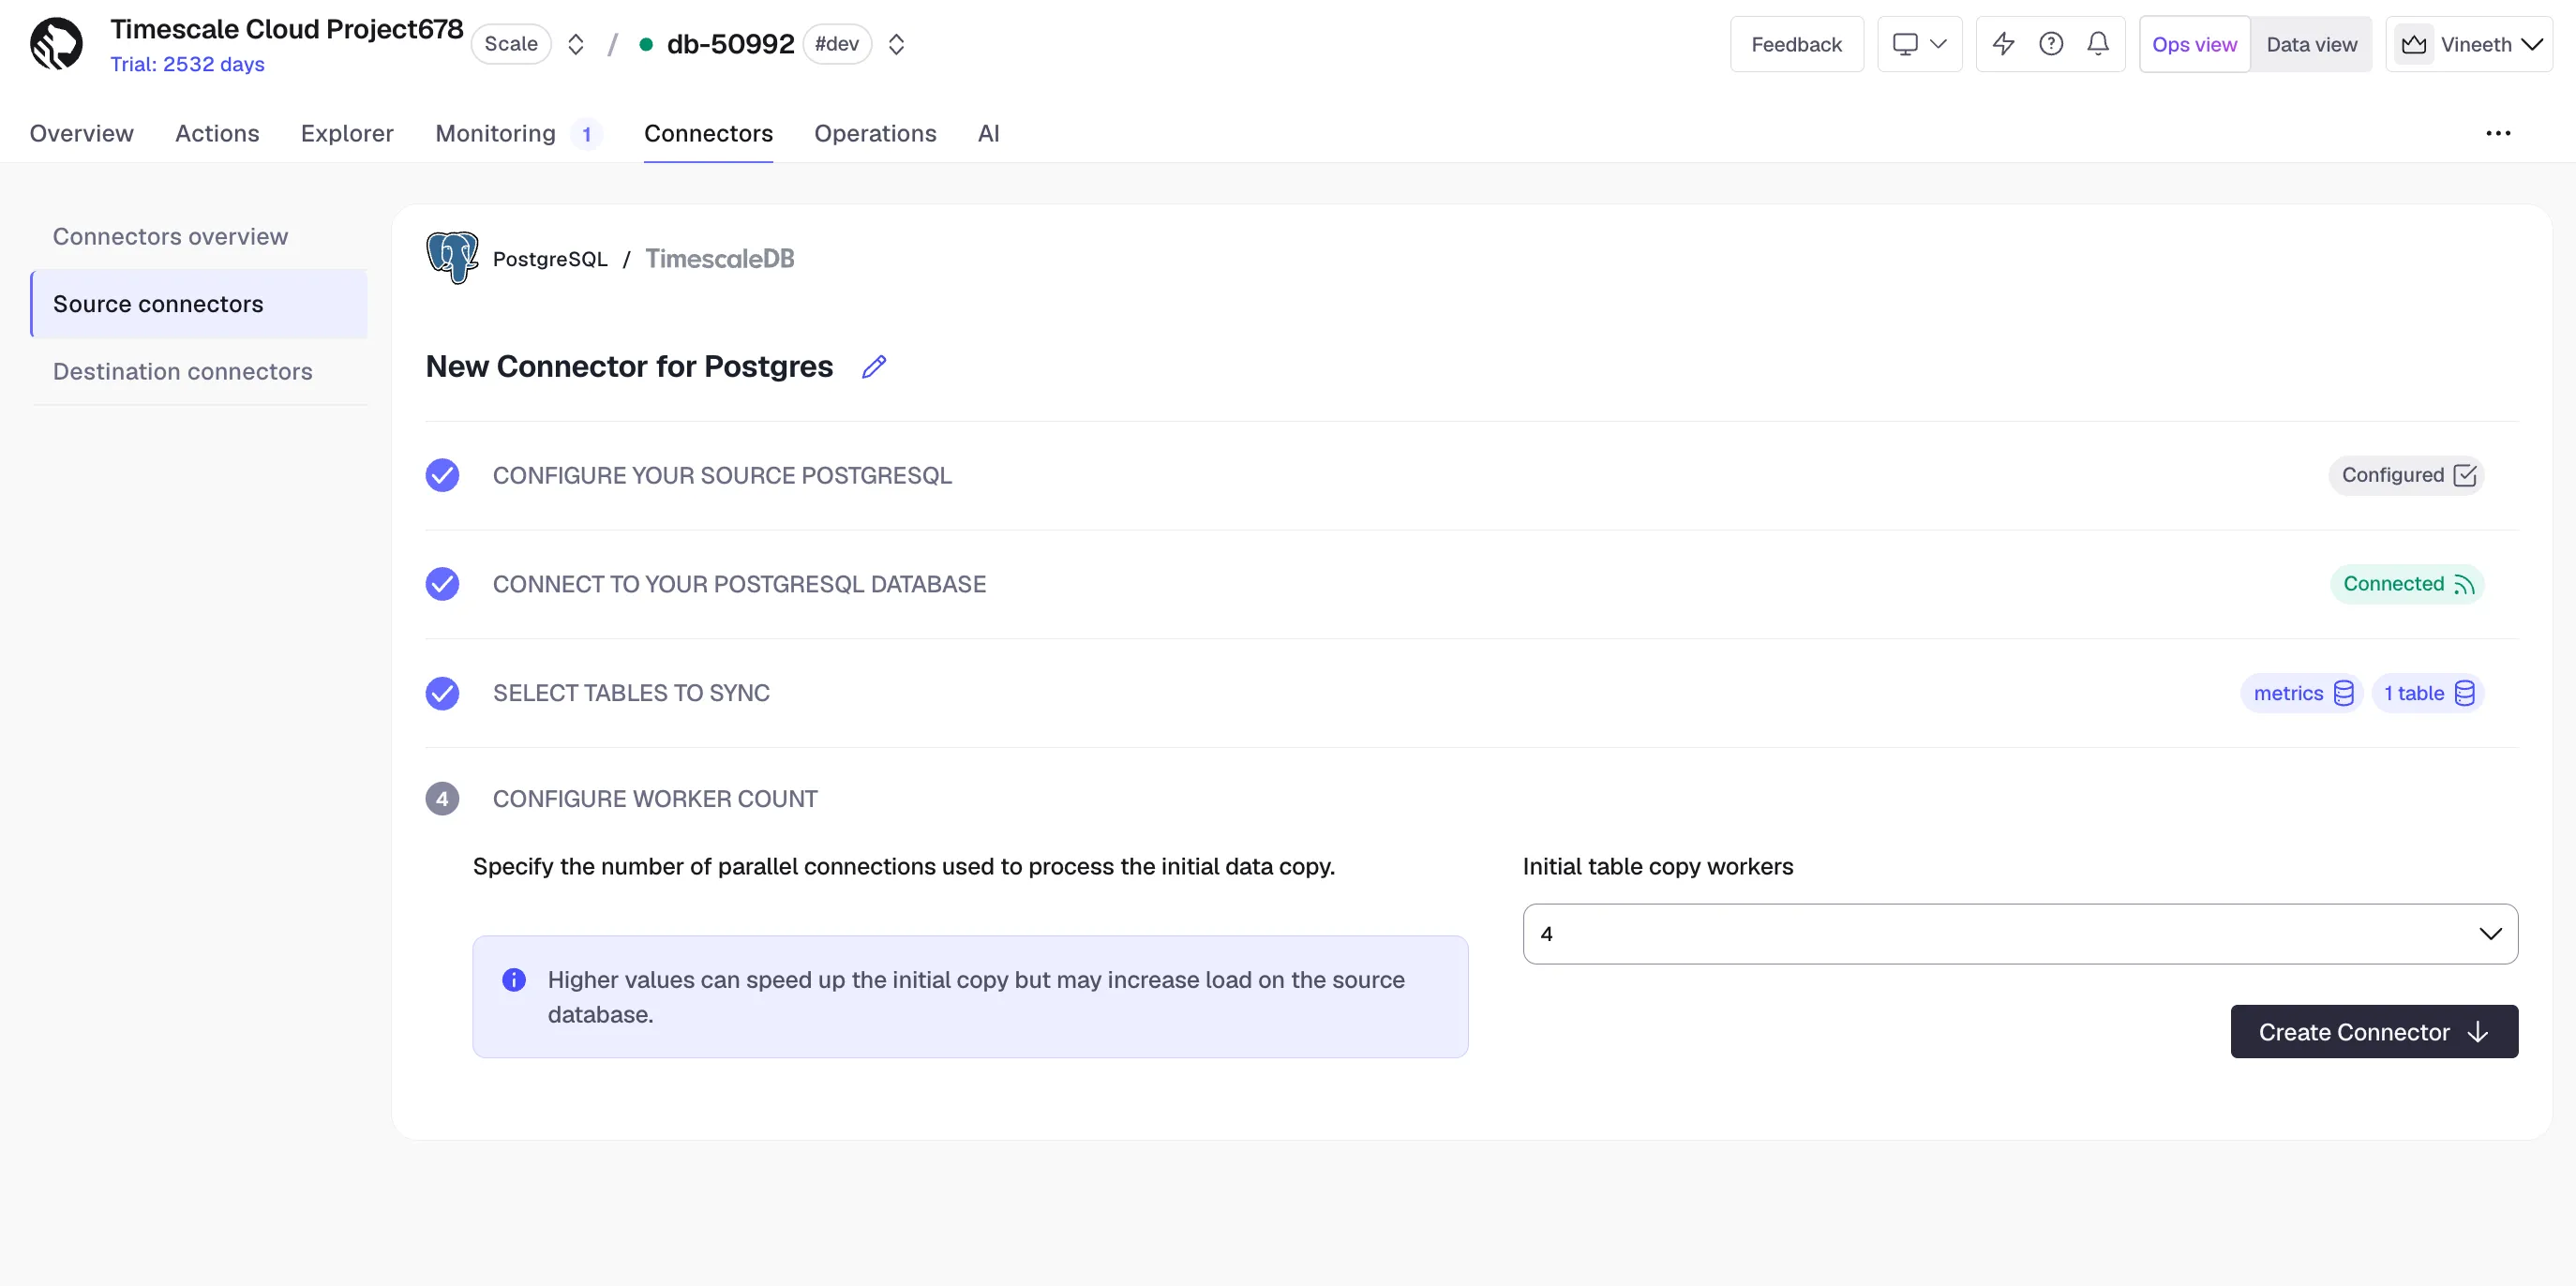
Specify the number of parallel connections — Initial Data Copy (IDC) workers — used to process the initial data copy. Higher values can speed up the initial copy but may increase load on the source database. Defaults to
4.Tune this based on the resources available on the source database and the number of tables being synced. Large individual tables still copy through a single connection, so higher worker counts help most when you have many small to medium tables.
Click
Create Connector. Tiger Console starts the source PostgreSQL connector between the source database and the target service and displays the progress. - Monitor and manage the connector
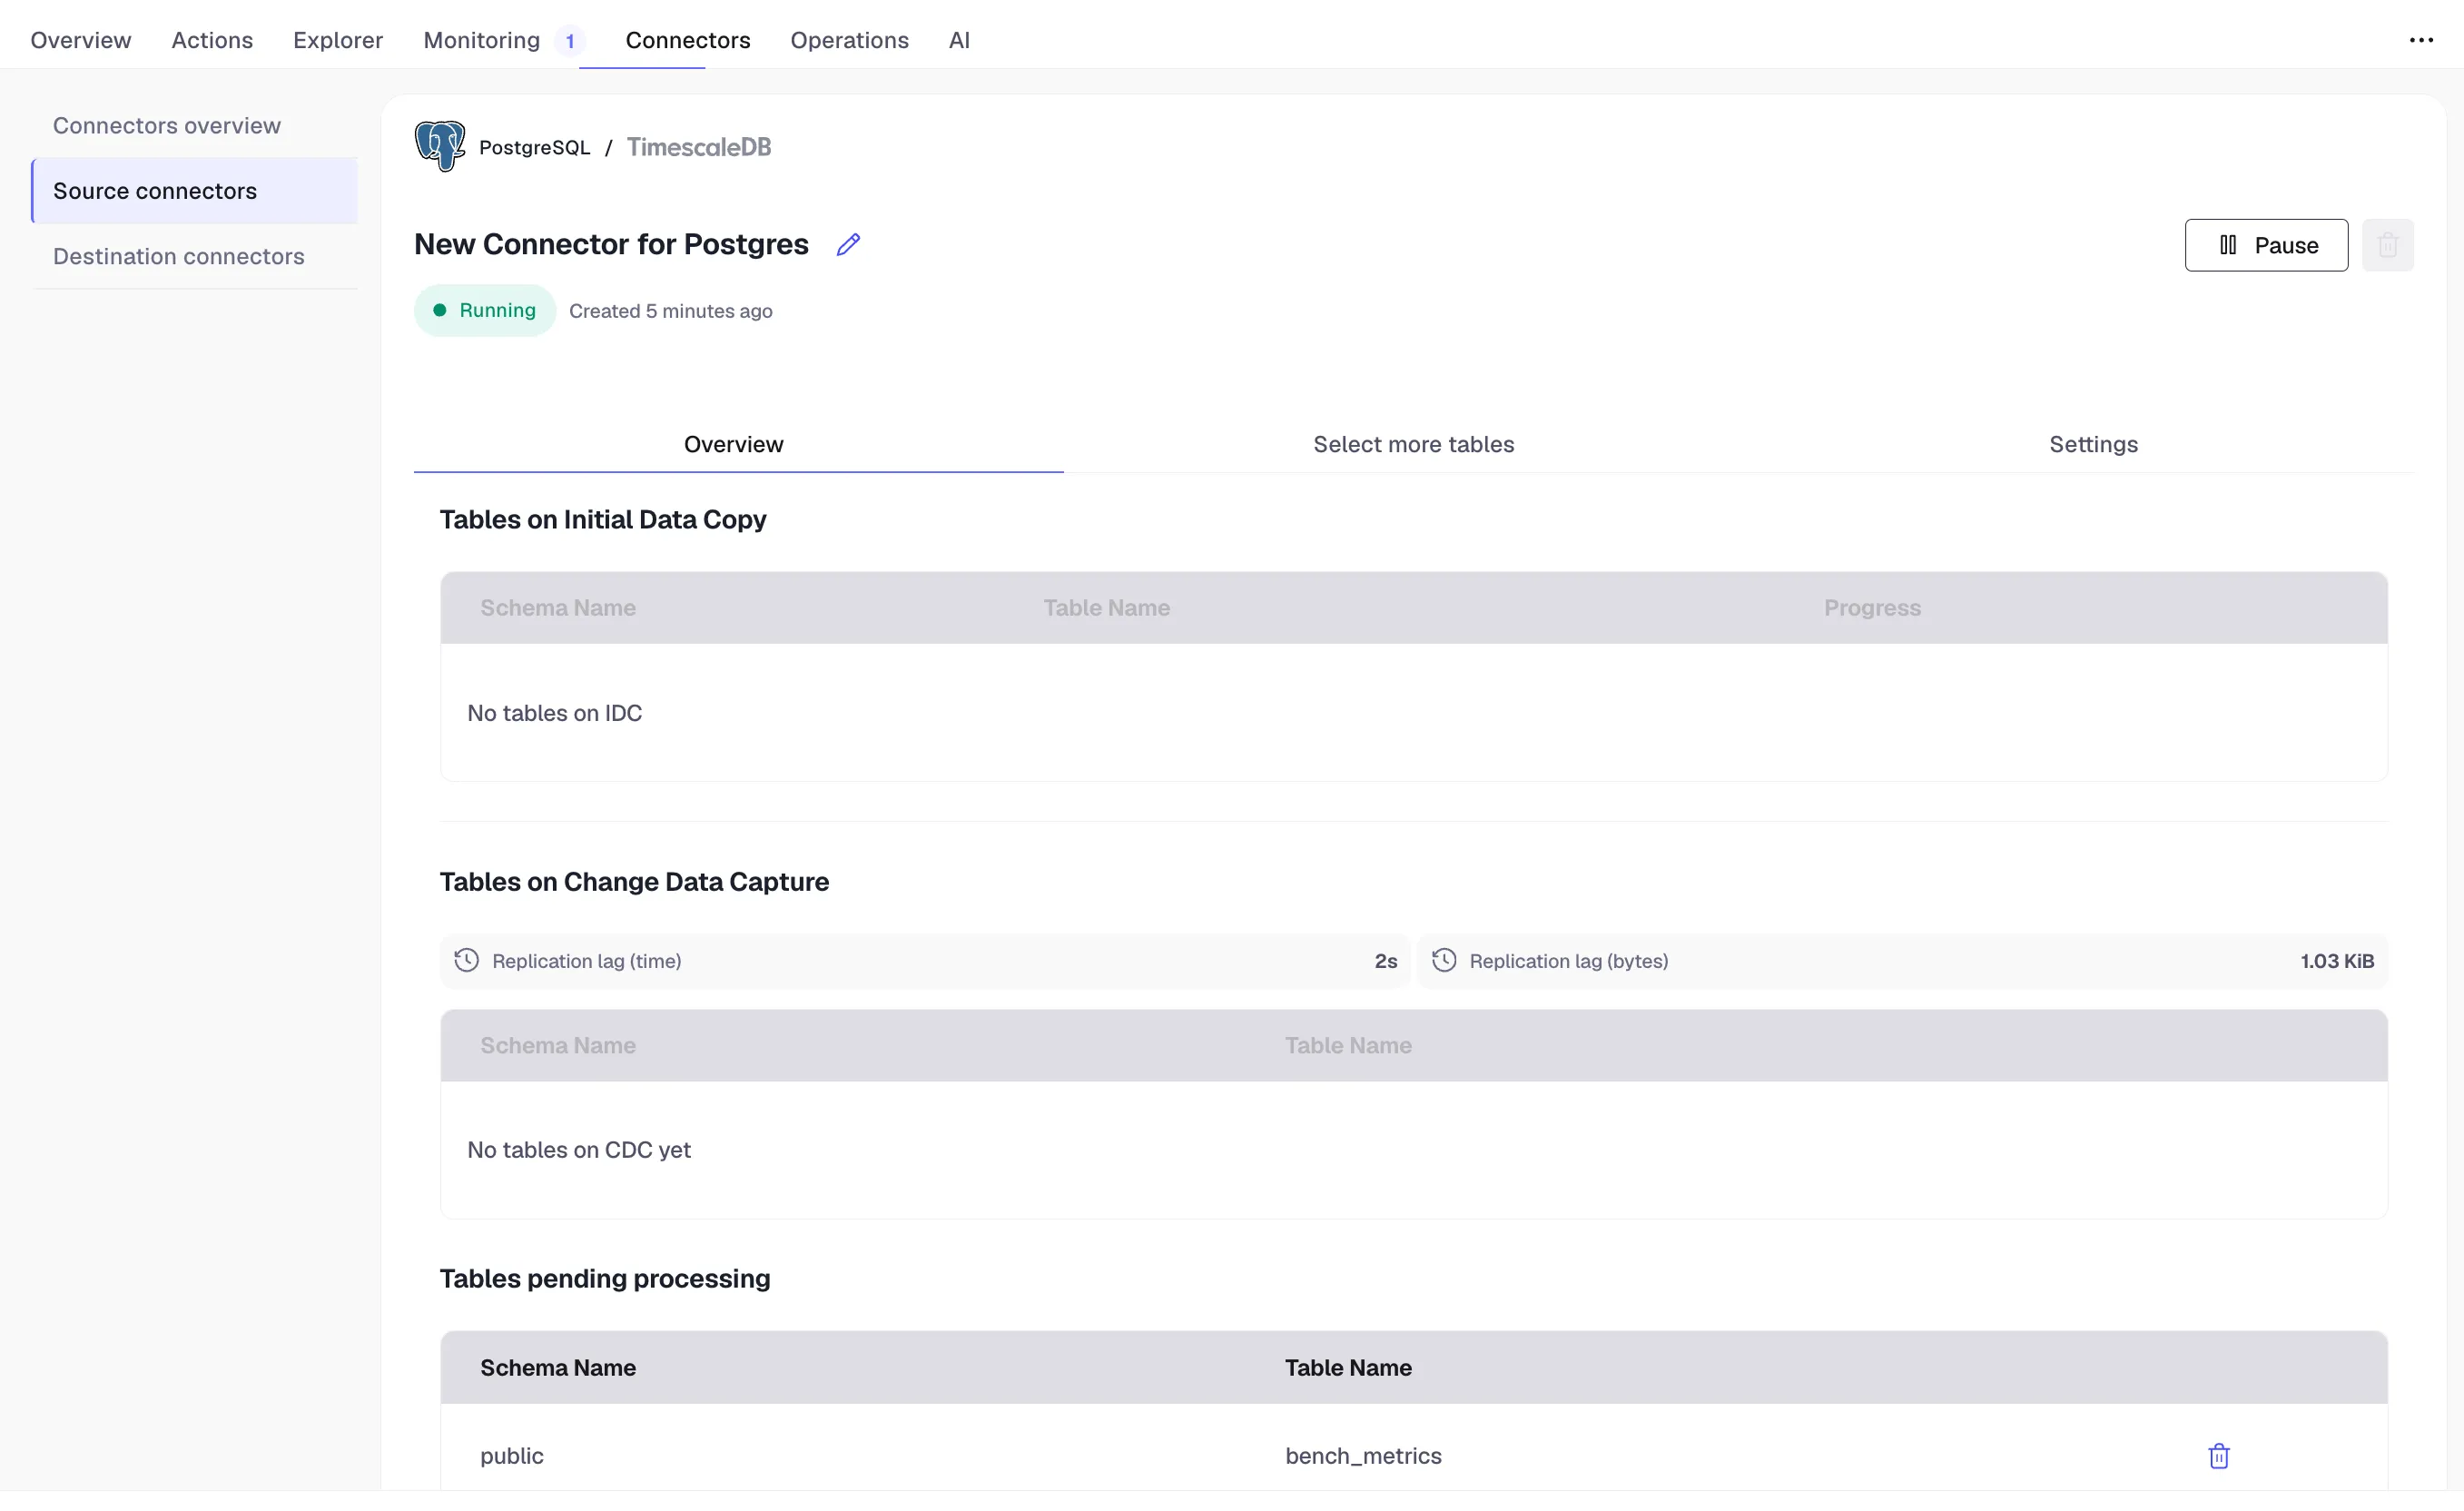
-
To review the syncing progress for each table, click
Connectors>Source connectors, then select the name of your connector in the table. -
To edit the connector, click
Connectors>Source connectors, then select the name of your connector in the table. You can rename the connector, delete or add new tables for syncing. -
To pause a connector, click
Connectors>Source connectors, then open the three-dot menu on the right and selectPause. -
To delete a connector, click
Connectors>Source connectors, then open the three-dot menu on the right and selectDelete. You must pause the connector before deleting it.
-
And that is it, you are using the source PostgreSQL connector to synchronize all the data, or specific tables, from a PostgreSQL database instance to your Tiger Cloud service, in real time.
Prerequisites for this integration guide
To follow these steps, you'll need:
-
A target Tiger Cloud service.
Best practice is to create a Tiger Cloud service with at least 8 CPUs for a smoother experience. A higher-spec instance can significantly reduce the overall migration window.
-
A migration machine to run the commands that move data from your source database to your target Tiger Cloud service.
Best practice: use an Ubuntu EC2 instance hosted in the same region as your Tiger Cloud service.
-
An adjusted maintenance window to prevent maintenance from running during migration.
-
The source PostgreSQL instance and the target Tiger Cloud service must have the same extensions installed.
The source PostgreSQL connector does not create extensions on the target. If the table uses column types from an extension, first create the extension on the target Tiger Cloud service before syncing the table.
-
Docker installed on your sync machine.
For a better experience, use a 4 CPU/16GB EC2 instance or greater to run the source PostgreSQL connector.
-
The PostgreSQL client tools installed on your sync machine.
This includes
psql,pg_dump,pg_dumpall, andvacuumdbcommands.
Limitations
- The schema is not migrated by the source PostgreSQL connector, you use
pg_dump/pg_restoreto migrate it.
-
Using TimescaleDB as the source has limited support (no CAGGs).
-
The source must be running PostgreSQL 13 or later.
-
Schema changes must be co-ordinated.
Make compatible changes to the schema in your Tiger Cloud service first, then make the same changes to the source PostgreSQL instance.
-
Ensure that the source PostgreSQL instance and the target Tiger Cloud service have the same extensions installed.
The source PostgreSQL connector does not create extensions on the target. If the table uses column types from an extension, first create the extension on the target Tiger Cloud service before syncing the table.
-
There is WAL volume growth on the source PostgreSQL instance during large table copy.
-
Continuous aggregate invalidation
The connector uses
session_replication_role=replicaduring data replication, which prevents table triggers from firing. This includes the internal triggers that mark continuous aggregates as invalid when underlying data changes.If you have continuous aggregates on your target database, they do not automatically refresh for data inserted during the migration. This limitation only applies to data below the continuous aggregate’s materialization watermark. For example, backfilled data. New rows synced above the continuous aggregate watermark are used correctly when refreshing.
This can lead to:
- Missing data in continuous aggregates for the migration period.
- Stale aggregate data.
- Queries returning incomplete results.
If the continuous aggregate exists in the source database, best practice is to add it to the PostgreSQL connector publication. If it only exists on the target database, manually refresh the continuous aggregate using the
forceoption of refresh_continuous_aggregate.
Set your connection strings
The <user> in the SOURCE connection must have the replication role granted in order to create a replication slot.
These variables hold the connection information for the source database and target Tiger Cloud service. In Terminal on your migration machine, set the following:
export SOURCE="postgres://<user>:<password>@<source host>:<source port>/<db_name>"export TARGET="postgres://tsdbadmin:<PASSWORD>@<HOST>:<PORT>/tsdb?sslmode=require"You find the connection information for your Tiger Cloud service in the configuration file you downloaded when you created the service.
Avoid using connection strings that route through connection poolers like PgBouncer or similar tools. This tool requires a direct connection to the database to function properly.
Tune your source database
Updating parameters on a PostgreSQL instance will cause an outage. Choose a time that will cause the least issues to tune this database.
- Update the DB instance parameter group for your source database
-
In https://console.aws.amazon.com/rds/home#databases:, select the RDS instance to migrate.
-
Click
Configuration, scroll down and note theDB instance parameter group, then clickParameter groups
-
Click
Create parameter group, fill in the form with the following values, then clickCreate.- Parameter group name - whatever suits your fancy.
- Description - knock yourself out with this one.
- Engine type -
{C.PG} - Parameter group family - the same as
DB instance parameter groupin yourConfiguration.
-
In
Parameter groups, select the parameter group you created, then clickEdit. -
Update the following parameters, then click
Save changes.rds.logical_replicationset to1: record the information needed for logical decoding.wal_sender_timeoutset to0: disable the timeout for the sender process.
-
In RDS, navigate back to your databases, select the RDS instance to migrate, and click
Modify. -
Scroll down to
Database options, select your new parameter group, and clickContinue. -
Click
Apply immediatelyor choose a maintenance window, then clickModify DB instance.Changing parameters will cause an outage. Wait for the database instance to reboot before continuing.
-
Verify that the settings are live in your database.
-
- Enable replication
DELETEandUPDATEoperationsReplica identity assists data replication by identifying the rows being modified. Your options are that each table and hypertable in the source database should either have:
- A primary key: data replication defaults to the primary key of the table being replicated. Nothing to do.
- A viable unique index: each table has a unique, non-partial, non-deferrable index that includes only columns marked as
NOT NULL. If a UNIQUE index does not exist, create one to assist the migration. You can delete it after migration. For each table, setREPLICA IDENTITYto the viable unique index:psql -X -d $SOURCE -c ‘ALTER TABLE <table name> REPLICA IDENTITY USING INDEX <_index_name>‘ - No primary key or viable unique index: use brute force. For each table, set
REPLICA IDENTITYtoFULL:
For eachpsql -X -d $SOURCE -c ‘ALTER TABLE <table_name> REPLICA IDENTITY FULL’UPDATEorDELETEstatement, PostgreSQL reads the whole table to find all matching rows. This results in significantly slower replication. If you are expecting a large number ofUPDATEorDELETEoperations on the table, best practice is to not useFULL.
- Tune the Write Ahead Log (WAL) on the PostgreSQL source databasepsql $SOURCE <<EOFALTER SYSTEM SET wal_level='logical';ALTER SYSTEM SET max_wal_senders=10;ALTER SYSTEM SET wal_sender_timeout=0;EOF
This will require a restart of the PostgreSQL source database.
- Create a user for the connector and assign permissions
-
Create
<pg connector username>:psql $SOURCE -c "CREATE USER <pg connector username> PASSWORD '<password>'"You can use an existing user. However, you must ensure that the user has the following permissions.
-
Grant permissions to create a replication slot:
psql $SOURCE -c "ALTER ROLE <pg connector username> REPLICATION" -
Grant permissions to create a publication:
psql $SOURCE -c "GRANT CREATE ON DATABASE <database name> TO <pg connector username>" -
Assign the user permissions on the source database:
psql $SOURCE <<EOFGRANT USAGE ON SCHEMA "public" TO <pg connector username>;GRANT SELECT ON ALL TABLES IN SCHEMA "public" TO <pg connector username>;ALTER DEFAULT PRIVILEGES IN SCHEMA "public" GRANT SELECT ON TABLES TO <pg connector username>;EOFIf the tables you are syncing are not in the
publicschema, grant the user permissions for each schema you are syncing:psql $SOURCE <<EOFGRANT USAGE ON SCHEMA <schema> TO <pg connector username>;GRANT SELECT ON ALL TABLES IN SCHEMA <schema> TO <pg connector username>;ALTER DEFAULT PRIVILEGES IN SCHEMA <schema> GRANT SELECT ON TABLES TO <pg connector username>;EOF -
On each table you want to sync, make
<pg connector username>the owner:psql $SOURCE -c 'ALTER TABLE <table name> OWNER TO <pg connector username>;'You can skip this step if the replicating user is already the owner of the tables.
-
- Enable replication DELETE and UPDATE operations
Replica identity assists data replication by identifying the rows being modified. Your options are that each table and hypertable in the source database should either have:
- A primary key: data replication defaults to the primary key of the table being replicated. Nothing to do.
- A viable unique index: each table has a unique, non-partial, non-deferrable index that includes only columns marked as
NOT NULL. If a UNIQUE index does not exist, create one to assist the migration. You can delete it after migration. For each table, setREPLICA IDENTITYto the viable unique index:psql -X -d $SOURCE -c ‘ALTER TABLE <table name> REPLICA IDENTITY USING INDEX <_index_name>‘ - No primary key or viable unique index: use brute force. For each table, set
REPLICA IDENTITYtoFULL:
For eachpsql -X -d $SOURCE -c ‘ALTER TABLE <table_name> REPLICA IDENTITY FULL’UPDATEorDELETEstatement, PostgreSQL reads the whole table to find all matching rows. This results in significantly slower replication. If you are expecting a large number ofUPDATEorDELETEoperations on the table, best practice is to not useFULL.
Migrate the table schema to the Tiger Cloud service
Use pg_dump to:
- Download the schema from the source database
Terminal window pg_dump $SOURCE \--no-privileges \--no-owner \--no-publications \--no-subscriptions \--no-table-access-method \--no-tablespaces \--schema-only \--file=schema.sql - Apply the schema on the target service
Terminal window psql $TARGET -f schema.sql
Convert partitions and tables with time-series data into hypertables
For efficient querying and analysis, you can convert tables which contain time-series or events data, and tables that are already partitioned using PostgreSQL declarative partition into hypertables.
- Convert tables to hypertables
Run the following on each table in the target Tiger Cloud service to convert it to a hypertable:
Terminal window psql -X -d $TARGET -c "SELECT public.create_hypertable('<table>', by_range('<partition column>', '<chunk interval>'::interval));"For example, to convert the metrics table into a hypertable with time as a partition column and 1 day as a partition interval:
Terminal window psql -X -d $TARGET -c "SELECT public.create_hypertable('public.metrics', by_range('time', '1 day'::interval));" - Convert PostgreSQL partitions to hypertables
Rename the partition and create a new regular table with the same name as the partitioned table, then convert to a hypertable:
Terminal window psql $TARGET -f - <<'EOF'BEGIN;ALTER TABLE public.events RENAME TO events_part;CREATE TABLE public.events(LIKE public.events_part INCLUDING ALL);SELECT create_hypertable('public.events', by_range('time', '1 day'::interval));COMMIT;EOF
Specify the tables to synchronize
After the schema is migrated, you CREATE PUBLICATION on the source database that
specifies the tables to synchronize.
- Create a publication that specifies the table to synchronize
A
PUBLICATIONenables you to synchronize some or all the tables in the schema or database.CREATE PUBLICATION <publication_name> FOR TABLE <table_name>, <table_name>;To add tables after to an existing publication, use ALTER PUBLICATION**
ALTER PUBLICATION <publication_name> ADD TABLE <table_name>; - Publish the PostgreSQL declarative partitioned tableALTER PUBLICATION <publication_name> SET(publish_via_partition_root=true);
To convert a partitioned table to a hypertable, follow Convert partitions and tables with time-series data into hypertables.
- Stop syncing a table in the
PUBLICATION, useDROP TABLEALTER PUBLICATION <publication_name> DROP TABLE <table_name>;
Synchronize data to your Tiger Cloud service
You use the source PostgreSQL connector docker image to synchronize changes in real time from a PostgreSQL database instance to a Tiger Cloud service:
- Start the source PostgreSQL connector
As you run the source PostgreSQL connector continuously, best practice is to run it as a Docker daemon.
Terminal window docker run -d --rm --name livesync timescale/live-sync:<version-tag> run \--publication <publication_name> --subscription <subscription_name> \--source $SOURCE --target $TARGET --table-map <table_map_as_json>-
version-tag: The latest available version tag of the live-sync image. See Docker Hub. -
--publication: The name of the publication as you created in the previous step. To use multiple publications, repeat the--publicationflag. -
--subscription: The name that identifies the subscription on the target Tiger Cloud service. -
--source: The connection string to the source PostgreSQL database. -
--target: The connection string to the target Tiger Cloud service. -
--table-map: (Optional) A JSON string that maps source tables to target tables. If not provided, the source and target table names are assumed to be the same.For example, to map the source table
metricsto the target tablemetrics_data:--table-map '{"source": {"schema": "public", "table": "metrics"}, "target": {"schema": "public", "table": "metrics_data"}}'To map only the schema, use:
--table-map '{"source": {"schema": "public"}, "target": {"schema": "analytics"}}'This flag can be repeated for multiple table mappings.
-
--table-sync-workers: (Optional) The number of parallel workers to use for initial table sync. Default is 4. -
--copy-data: (Optional) By default, the initial table data is copied from source to target before starting logical replication. Set tofalseso only changes made after replication slot creation are replicated. Best practice is to set tofalseduring dry-run livesync so you do not copy table data.
-
- Capture logs
Once the source PostgreSQL connector is running as a docker daemon, you can also capture the logs:
Terminal window docker logs -f livesync - View the progress of tables being synchronized
List the tables being synchronized by the source PostgreSQL connector using the
_ts_live_sync.subscription_reltable in the target Tiger Cloud service:Terminal window psql $TARGET -c "SELECT * FROM _ts_live_sync.subscription_rel"You see something like the following:
subname | pubname | schemaname | tablename | rrelid | state | lsn | updated_at | last_error | created_at | rows_copied | approximate_rows | bytes_copied | approximate_size | target_schema | target_table----------+-----------+------------+-----------+--------+-------+------------+-------------------------------+------------+-------------------------------+-------------+------------------+--------------+------------------+---------------+-------------livesync | analytics | public | metrics | 20856 | r | 6/1A8CBA48 | 2025-06-24 06:16:21.434898+00 | | 2025-06-24 06:03:58.172946+00 | 18225440 | 18225440 | 1387359359 | 1387359359 | public | metricsThe
statecolumn indicates the current state of the table synchronization. Possible values forstateare:state description i initial state, table data sync not started d initial table data sync is in progress f initial table data sync completed, catching up with incremental changes s synchronized, waiting for the main apply worker to take over r table is ready, applying changes in real-time To see the replication lag, run the following against the SOURCE database:
Terminal window psql $SOURCE -f - <<'EOF'SELECTslot_name,pg_size_pretty(pg_current_wal_flush_lsn() - confirmed_flush_lsn) AS lagFROM pg_replication_slotsWHERE slot_name LIKE 'live_sync_%' AND slot_type = 'logical'EOF - Add or remove tables from the publication
To add tables, use ALTER PUBLICATION .. ADD TABLE**
ALTER PUBLICATION <publication_name> ADD TABLE <table_name>;To remove tables, use ALTER PUBLICATION .. DROP TABLE**
ALTER PUBLICATION <publication_name> DROP TABLE <table_name>; - Update table statistics
If you have a large table, you can run
ANALYZEon the target Tiger Cloud service to update the table statistics after the initial sync is complete.This helps the query planner make better decisions for query execution plans.
Terminal window vacuumdb --analyze --verbose --dbname=$TARGET - Stop the source PostgreSQL connector
Terminal window docker stop live-sync - (Optional) Reset sequence nextval on the target Tiger Cloud service
The source PostgreSQL connector does not automatically reset the sequence nextval on the target Tiger Cloud service.
Run the following script to reset the sequence for all tables that have a serial or identity column in the target Tiger Cloud service:
Terminal window psql $TARGET -f - <<'EOF'DO $$DECLARErec RECORD;BEGINFOR rec IN (SELECTsr.target_schema AS table_schema,sr.target_table AS table_name,col.column_name,pg_get_serial_sequence(sr.target_schema || '.' || sr.target_table,col.column_name) AS seqnameFROM _ts_live_sync.subscription_rel AS srJOIN information_schema.columns AS colON col.table_schema = sr.target_schemaAND col.table_name = sr.target_tableWHERE col.column_default LIKE 'nextval(%' -- only serial/identity columns) LOOPEXECUTE format('SELECT setval(%L,COALESCE((SELECT MAX(%I) FROM %I.%I), 0) + 1,false);',rec.seqname, -- the sequence identifierrec.column_name, -- the column to MAX()rec.table_schema, -- schema for MAX()rec.table_name -- table for MAX());END LOOP;END;$$ LANGUAGE plpgsql;EOF - Clean up
Use the
dropsub-command to remove the replication slots created by the source PostgreSQL connector on the source database.Terminal window docker run -it --rm --name livesync timescale/live-sync:<version-tag> drop \--subscription <subscription_name> --source $SOURCE --target $TARGET